Saturday, January 31, 2009
CPSIA - one year stay of testing!!!
Yesterday, the CPSC granted a one year stay of testing! The stay does not cover all products, but Crafts are included!!!

The stay of enforcement provides some temporary, limited relief to the crafters, children’s garment manufacturers and toy makers who had been subject to the testing and certification required under the CPSIA. These businesses will not need to issue certificates based on testing of their products until additional decisions are issued by the Commission. However, all businesses, including, but not limited to, handmade toy and apparel makers, crafters and home-based small businesses, must still be sure that their products conform to all safety standards and similar requirements, including the lead and phthalates provisions of the CPSIA.
You can read all the details on the CPSC website, here.

If you do sell products, please make sure that the zippers, findings and other "parts" that you use are certified lead free.

Thank you so much to all of you who took the time to write to your legislators and to the CPSC! Our efforts have paid off!! We will need to continue voicing our needs and concerns so that we are covered next year when the stay expires, but I think this is GREAT news!!


Wednesday, January 28, 2009
My Mom

Back in November I made slippers to give to my mom and dad. He was very polite about it, but I don't think Dad really liked his very much. Mom on the other hand just loved hers. On several occasions she told me how warm and comfortable they are, and that she wears them everyday.

Yesterday she called me to tell me that she wore them through, and to ask me to make another pair for her. It's a nice feeling to know that you made something for someone that they like enough to wear out!

I made her another pair using the same pattern. I hope she likes these as well as the original.


Snow Day


We woke up this morning to 10" of snow. The roads weren't plowed, so for the first time since high school I had a snow day!!!! I had my laptop, so I worked from home.

The boys.....not so much.


Monday, January 26, 2009
Monkey Business!


When I heard that there is a Marine Corps Baby due in March, and that his parents are decorating his room with monkeys, I knew that this piece of fleece would make the perfect blanket!

A little jacket with monkey and banana buttons completed the set.

I think this one is just plain fun!


Sunday, January 25, 2009
CPSIA and Charitable Organizations


As you may be aware, I am the co-founder of a wonderful organization called Operation Marine Corps Kids. Operation Marine Corps Kids sends hand-crafted gifts to babies born to deployed Marines and Soldiers.

The Consumer Product Safety Improvement Act is scheduled to become effective on February 10th. While the law has some necessary and required aspects, the scope of it's wording could be devastating to charitable organizations such as Operation Marine Corps Kids, Project Linus, Caps for Kids and hundreds of other charitable organizations.

We desperately need Congress to clarify the law in regard to charities. The consequences of the law to Marine Corps Kids could be extraordinary; if the potential liability to our organization cannot be minimized or eliminated, we may have no choice but to disband.

I am writing to ask you to write letters to your Congressmen and Senators. We need to ask Congress to act swiftly to clarify this law and make reasonable exclusions in their interpretation of the law as they continue the rule-making process.

Below is a sample letter that you are welcome to copy and paste (fill in the blanks as indicated) and send to your congress person, senator, the Consumer Product Safety Commission or Committee on Energy and Commerce members. Some can be sent via e-mail, but if you are not in the district of the congress person or senator you may need to send your letter via snail mail. Whatever you can do to help will be most appreciated.

To locate the contact information for your congress person go to
https://writerep.house.gov/writerep/welcome.shtml

To locate the contact information for your US Senator go to
http://www.senate.gov/general/contact_information/senators_cfm.cfm

Thank you for your continued support of Marine Corps Kids and all charitable crafting organizations!

Delia


Sample Letter:

Bill Number H.R.4040 Consumer Product Safety Improvement Act

Date:

From: [your name and address]
To: [your congress person or senator]
Re: The Consumer Product Improvement Act (CPSIA) clarification regarding charities


Dear [your congress person, senator, CPSC or Committee on Energy and Commerce members],

As a volunteer and supporter of Operation Marine Corps Kids [or charity of your choice], a 501c3 National Non-profit organization, I am very concerned about the effect the Consumer Product Improvement Act (CPSIA) H.R. 4040 will have on our organization as of February 10, 2009.

Like many people, I was deeply concerned by the dangerous and poisonous toys that large Chinese toy manufacturers have been selling to our families. I was pleased that Congress acted quickly to protect America's children by enacting the CPSIA. However, I am very concerned that the CPSIA's mandates for third-party testing and labeling could have a dramatic and negative effect on charitable organizations such as Marine Corps Kids.

Marine Corps Kids collects and distribute gifts of handmade blankets, hats, booties, toys and other items to the babies and children of our deployed military forces. (See http://www.marinecorpsfamilyfoundation.org/OperationMarineCorpsKids.html and http://marinecorpskids.blogspot.com for more information.)

Donors from all over the country have sent handcrafted gifts that have been distributed to hundreds of children. If charities such as ours are not exempt from the CPSIA our military families will no longer benefit from the generosity of our donors.

Operation Marine Corps Kids does not sell anything. Hand-crafted items are all given as gifts. We are the consumer and not a retailer or seller, however the current wording in the CPSIA can be interpreted to include organizations such as ours. We are a charity and would never have the funds to submit each item made by our volunteers to the expensive testing required. Our new President has encouraged us to volunteer and perform acts of service. This is what Marine Corps Kids’ volunteers do; it would be devastating to volunteers such as myself to have our organization closed due to the CPSIA.

I urge you to quickly request the Consumer Product Safety Commission and the Committee on Energy and Commerce to make some very reasonable exclusions in their interpretation of the law as they continue their rule-making process. This would include exempting nonprofit organizations and charities that do not retail their products.

Thank you for your attention with regard to this matter.

Sincerely,

[your name]


Blue Cheetah
I've heard that little boys can be wild. I know that little boys are very cute. So this cute cheetah print should be perfect!

I made the blanket using Edgerydoo and the 12" square template. The little jacket was made combining templates. I used the new Edgerydoo 002 template under the arms to make the seams tighter, but used the original edgerydoo around the neck, sleeves and bottom - mostly because it was faster.

This set will be donated to Marine Corps Kids.


Tuesday, January 20, 2009
Inaguration Day


Today was a day in history that we will all remember. Today was quite incredible.

I don't generally get political in this blog, but I couldn't let the day pass without commenting.

Watching the coverage left me with a wonderful feeling. It was amazing. It was inspiring. It was moving. At times it felt like witnessing a marriage ceremony - the solemnity of vows spoken in front of witnesses and in front of God - the performances of great musicians - the sheer joy of those who bore witness to the day's events.

Today I witnessed history.

Good luck, Mr. President. Thank you for the gift of hope and the promise of change.


Sunday, January 18, 2009
A gift for me!!!


This week I received a wonderful gift!

Marlene and Byron, the creators of Edgerydoo, sent me an Edgerydoo 002 template! If you've followed my blog at all, you know I'm a big fan of the Edgerydoo.

Edgerydoo 002 is a template similar to the original, but it's made with the holes closer together to use with thinner yarns or thread on flannel or other fabrics. Marlene thought the smaller template might work well with my new jacket design, and that I might have fun trying it on flannel or other fabrics. Of course I was delighted!

So today, I used the smaller template to pierce some fleece for another jacket. With all the yarn in my stash, you think I would have had something on hand, but I had to go out and buy a thin yarn that would work with this crazy leopard pattern. I found this yellow and orange Sassy Stripe from Cascade Yarns that matches the fleece perfectly!

Marlene was right! With the holes closer together, the side seams on the jacket are tighter and look more neat.

I used a 1.75 mm hook throughout. This project took somewhat longer to make than the first 2 jackets I completed. With the holes closer together, there are more stitches involved, and working with this tiny hook demands more care. I love the look of the smaller tighter stitches, and think this jacket came out really cute.

The crazy leopard design won't appeal to everyone - it doesn't scream out "baby", but it's cute in it's own way. I'm going to send this one to Marine Corps Kids, and hope that one of the mom's likes this for her baby girl.

Thank you Marlene and Byron! You know that I love Edgerydoo, and I'm going to have a lot of fun playing with Edgerydoo 002!!


Saturday, January 17, 2009
Stash Busting


The thought of stashbusting my yarn makes me laugh. My fleece stash has been growing quite large though, and today the time came to try and get it under control. I spent several hours this afternoon going through my fleece and starting to cut. I cut several pieces to be ready for blankets and jackets, and then cut all the small "scraps" into 8" or 12" squares.

That left me a few larger scrap pieces that I wasn't ready to throw out, so I decided to try trimming a blanket with contrast fabric. The result was this pink blanket. I used an odd sized rectangular of pink fleece, and trimmed it with two strips of patterned teddy bear fleece.

Joining these strips so that the fabric didn't pull or buckle took a few tries, but in the end, I think the blanket is cute. I used a simple shell design to edge the blanket.

This blanket will be going to Marine Corps Kids.


Wednesday, January 14, 2009
A Tater's Work is Never Done.
Exhausting!


Flapper Cap

After making several Tiffany Caps in extremely unfortunate color combinations, I became frustrated trying to write up that pattern. Instead I made a more simple version that I thought I would be able to write up more easily.

I ended up making this cap a bit on the long side (and given the freezing temps outside, I really like that it totally covers my ears and forehead!!!). The result was that it has a sort of 1920's flapper feel to it.

The pattern is detailed below. It's not difficult to make, but I wasn't sure how to best explain the last few rows in the instructions. As a result, they might not be as clear as they should be. If any of you would like to test this pattern for me and let me know if the directions are understandable, I would appreciate it! I can modify the pattern instructions if I get some input from those of you who are brave enough to try!

Thank you!!!!


Flapper Cap

You'll need 2 colors worsted weight yarn (I used Bernat Simply Soft in Raspberry and Black)

H hook

Note: Chain 3 at beginning of each round counts as first DC


To start: Using contrast color Chain 4 – join w/ slip stitch to form ring.


Round 1 – chain 3, 11 dc in ring (12 dc) join w/ slip stitch, switching to main color.


Note – as you switch back and forth between colors, you want to carry the unused yarn around each round. Hold the unused yarn over the stitch in the previous row and carry it until needed. As the hat grows, the unused color will peak through the stitches giving the color more texture. The weight of the unused yarn will also make the hat thicker and warmer.


Round 2 – with main color chain 3 (first DC),.With contrast color FPDC in next stitch, switch back to main color and DC in same stitch . Continue around doing a FPDC around each stitch with the contrast color, and a DC (increase) with the main color. Join w/ slip stitch using main color.


Continue increasing each round through round 6. In each of these rounds use the contrast color to create a FPDC around each FPDC in the previous round. With the main color, you will increase by doing one DC in the same stitch as the FPDC and a DC in all other stitches.


Round 3 – (12 FPDC in contrast color, 24 DC in main color) - 2 DC between each FPDC


Round 4 (12 FPDC in contrast color, 36 DC in main color) – 3 DC between each FPDC


Round 5 (12 FPDC in contrast color, 48 DC in main color) – 4 DC between each FPDC


Round 6 (12 FPDC in contrast color, 60 DC in main color) – 5 DC between each FPDC


Round 7 – stop increasing. Do a contrast color FPDC in each FPDC from row 6. Do a DC in each DC from previous row. (12 FPDC in contrast color, 60 DC in main color) - 5 DC between each FPDC


Rounds 8-15 – repeat row 7


Round 16 - You should have finished round 15 by joining with your main color. Chain 3 to form your first DC. Now drop main color (do not carry it around – let it hang and you’ll pick it up in part 2 of this round). Working with contrast color, FPDC in FPDC in previous row. Chain 7 – FPDC around next FPDC. Continue around (12 FPDC and 12 7-chain loops) When you finish the last chain 7, go under the first loop, slip stitch behind the first FPDC and finish off. (cut the yarn and weave the tail in)


Continuing with Round 16 - working with main color- DC in every stitch from previous row (working behind the chain loops just formed). Be sure to DC in every DC and in every FPDC. (72 dc)


Round 17 – chain 3. DC in each stitch around. Join w/ slip stitch and finish off. (72 DC)


Round 18 – working with contrast color – attach yarn w/ slip stitch near back seam of hat. Referring back to


Round 16 – identify the stitch in the middle of the first chain-7 loop (the center of the 5 DC between each FPDC). HDC up to the middle of the first loop – then catching the 7-chain Loop in your stitch, FPDC in the around the stitch in the middle of the loop. You will be pulling the 7-chain loop downwards, and anchoring it to the body of the hat. Continue around HDC in each stitch and FPDC in the center of each section.. Join with slip stitch. Chain 1.


Round 19 – SC around, join w/ slip stitch and finish off. Weave in the tail.


Good luck!


Saturday, January 10, 2009
Consumer Product Safety Improvement Act of 2008
Over the last few days I have received several e-mails from other crafters about the CPSIA and it's negative impact on small businesses. I think that this is an important issue, so I'm blogging about it in hopes that you will help to amend this legislation.

The Consumer Product Safety Improvement Act is legislation passed in response to the barrage of unsafe imported toys over the past 2 years. The goal of the legislation is to protect children from lead and/or other dangerous content in toys and clothing. Overall, this is a very good thing. We all want to keep our children safe!

The scope of the law, however is too broad, and the effect is that thousands of small businesses in the US will be forced to cease operations because they can not comply with the law.

Quote from Change.Org

Among other things, the CPSIA bans lead and phthalates in children's products, mandates third party testing and certification, and requires manufacturers of all goods for children under the age of 12, to permanently label each item with a date and batch number.

All of these changes will be fairly easy for large, multinational companies to comply with. Large manufacturers who make thousands of units of each item have very little incremental cost to pay for testing and updating their systems to include batch labels. Small businesses however, will likely be driven out of business by the costs of mandatory testing, to the tune of as much as $4,000 or more per item. And the few larger manufacturers who still employ workers in the United States face increased costs to comply with the CPSIA, even though American-made toys had nothing to do with the toy safety problems of 2007.

Anyone who produces or sells any of the following new or used items will be required to comply with the law: toys, books, clothing, art, educational supplies, materials for the learning disabled, bicycles, and more. Any uncertified item intended for children under the age of 12 will be considered contraband after February 10, 2009.
As of Thursday, the legislation has been changed to exclude thrift stores and second hand stores from the mandatory testing.

No change has yet been made for small businesses/manufacturers in the United States. This means that a wood carver who sells handmade trains or cars from his garage, or a crocheter who sells handmade childrens or baby clothing will no longer be able to sell their products without a huge investment in required tests.

I care about protecting small businesses. I also care about allowing individual crafters the opportunity to sell their work. I worry about what this law might mean down the road to Organizations like Operation Marine Corps Kids, Project Linus and hundreds of other charitable groups that collect handmade items to distribute to children in need.

I'm hoping that this law can be changed to focus on the international businesses who have been wreckless in the past, and to allow small businesses here in the U.S. to continue offering quality products.

You can help, by supporting the request for change.

Go to the Handmade Toy Alliance webpage for more information on how to help, and place your vote to help save small businesses at Change.org.

Thank you!


Friday, January 09, 2009
Preemie Set

I got word today that a tiny preemie was just born at Camp Lejeune. I don't have any preemie sized pieces to send for Marine Corps Kids, so I decided to make a quick set.

Using my Edgerydoo and my Abra Kadabra Jacket design, I make this little jacket and crocheted a matching hat. The jacket isn't tiny, but I scaled it down to fit a newborn. It's 12" across (sleeve to sleeve) and 8" from shoulder to hem. Probably too big for him right now, but he should fit into it soon.

I followed the basic pattern that I posted earlier, added a crocheted collar and sewed on a button and loop.

This is a really fast a simple way to make charity patterns.

This one will be in the mail this weekend.


Tuesday, January 06, 2009
Opinions please


Tiffany Hat - Take Two and Take 3.

Honestly, I'm not even sure if I like it anymore.
I'm told the pink one looks like brains (I can see that).
So I did the black and pink one - now I think it looks like bloody brains.

To continue or to quit - that is the question.


How to "Doo" a Fleece Jacket

My friend Marlene from Edgerydoo liked this little jacket that I made, so I told her I would write up instructions to share online.

This jacket is really so easy to make, and there are so many different ways you can finish and embellish it.

Start with a piece of fleece - you want to use a solid or a non-directional pattern (if you use something with one direction, one side will be upside down).

Size - you can make this in any size you want, from preemie, to newborn, and everything all the way up to adult. Basically, start with a piece of fleece big enough to fit whoever you're making it for. I wanted to make this for a baby, so I just eyeballed what looks like baby size to me.

I started with a rectangular piece of fleece 15" wide by 20" long. This resulted in a "baby size". I don't have a baby close by, so I can't tell you if it's 3 months or 6 months - just adjust it to look right to you.

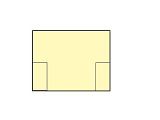
Fold the fabric the long way and lay on your cutting board so the folded end is away from you. You're going to cut two rectangles to create the sleeves. The rectangles that I cut are about 2" wide by 5" high. (again - don't get too caught up in measurements - if the proportions look right to you, it's probably ok)

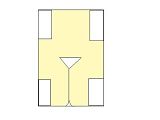
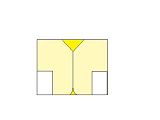
The diagram below shows where you want to cut. (I know it's small - the diagram is clickable) This diagram and the ones to follow are not drawn to scale - they're just to give you an idea of where and how to cut the fabric.

step one - cut out under arms

Now, open the fabric and lay it flat. The part closest to you will be the front of the jacket, the part far from you will be the back. Using your Edgerydoo and a rotary cutter (or scissors if you don't have a cutter) slice the front of the jacket up the middle to form the opening. Then cut a triangle as diagrammed to create the neck opening. The triangle that I cut is about 4" on each side (again - do what looks right for the size you're making). I used my Edgerydoo 001 triangular template to round out the corners in the center front. This is just a matter of taste. You can leave them square if you prefer.

step 2 - cut neck hole and front

Now fold the fleece back so you can see what the jacket will look like. In the diagram below, the light yellow is the body of the jacket. The dark yellow peeking through is the inside of the back.

step 3 - fold and finish

Now - to turn this into a jacket...

Unfold the fleece and lay it flat on your punching board. With the Edgerydoo, pierce the fabric along all the edges. Now, with a 3mm hook and the yarn of your choice, crochet around the edge doing one sc in each hole and 2 chains between. When the entire fabric is edged, finsh off your yarn.

Fold the jacket right side out.

Holding the two sides together slip stitch the front and back together under the arms and down the sides.

Now finish the arm holes, neckline and hem with the crochet edging of your choice. In the example above I just did another row of single crochet around. You can keep it simple or do any fancy edging you like.

From there, have fun! Use the scrap fabric that you cut from under the arms to cut pockets to add to the front. Crochet ties to secure the front or add buttons. Sew on patches or embroider designs on the front. Of just leave it simple.

Hope these instructions help!!!


I'm happy to share this idea with you. If you like this project, please consider making a baby sized jacket and donating it to Marine Corps Kids - its a simple way to say "thank you" to our military familes.


Monday, January 05, 2009
Abra Kadabra
Call it creative - call it lazy - either way, I had the idea that I could make a really quick baby jacket using the Edgerydoo. I was right!

I made this in about 2 hours and it was easy!

I folded a rectangular piece of fleece. Cut rectangles from the two corners to create the underarm shape. Sliced up the front, cut a triangular neck, and rounded the bottom corners.

I then pierced the fleece all around. SC'd in each hole with 2 chains in between. Slip stitched up the sides and underarm. SC around the whole edging and Tadah - it's a jacket.

I made this one in my least baby like fleece because it was my first attempt and I wasn't sure it would work. It could be made in any solid or non-directional design. If the fabric pattern has a specific direction, the front and back would have to be cut separately and another seam would need to be sewn across the shoulders. This would be do-able, but more complicated.

I'm sure I'll make more. It's a really quick way to make a cuddly little jacket. Hubby thinks it looks like an Aladdin jacket - lest the name Abra Kadabra.

I can see making lots of versions of this design. Once the basic jacket is assembled, it can be finished with any edging patterns. Ties or button closures can be added. Pockets can be sewn on. It can be embellished with patches, appliques or embroidery.

I think making these will be fun!!!

If anyone else tries this design, I would love to see photos of what you create!!


Sunday, January 04, 2009
Another Edgerydoo set

No sooner did I get the last three sets in the mail, and I found out that we have another Marine Corps Baby Girl!

I had a little fleece left from the last panel, but I was afraid to use it since the last blanket was so difficult.

This one gave me no problems! I did a simple looped edge in the variegated yarn. This time I made the hat in the variegated yarn and used pale pink for the border.


Friday, January 02, 2009
Three Cute Sets - One Cantankerous Piece of Fleece!
Before the holidays I sent all of the donations that I had received for Marine Corps Kids to the bases. In hindsight, it might have been smart to keep some things for after the holidays, but I had received so many wonderful gifts and I wanted to get them to the families as quickly as possible.

Last week I got names and addresses for 3 baby girls who's daddy's are all in Iraq. I want to send them gifts quickly, so I decided to get out the Edgerydoo and make 3 blankets.

I had a very cute piece of baby girl fleece that I cut and pierced to make three receiving blankets. The first went fairly quickly. I trimmed it with pink yarn and then made a Bordering on Adorable cap to match.


For the second, I used the same edging, but changed to a variegated yarn. That one went quickly too, and I made a matching hat to complete the set.


The third one.....the third one was a challenge. All the fabric was cut from the same panel, so I'm not sure what went wrong, but the third blanket was very cantankerous. I couldn't get the hook through the fabric. I was using the same hook and the same yarn as for blanket #2, but I had no luck. I made a matching hat, then tried again to make the blanket. I re-pierced all of the holes around the fabric edge, but still could not get the hook and yarn through. I must admit that it made me a bit mad. Finally, I gave up and with a yarn needle, did a simple blanket stitch around the edging. Since I used the Edgerydoo, the pierced holes were well spaced, and the stitching was easy, but I hated the way it looked. It was so .....unfinished. In despair, I put the blanket down and made a pair of SLK Booties to send with the hat.

The hat and bootie set was cute, but I really wanted to make the blanket. In a last ditch effort, I picked up the blanket again. Using a smaller hook this time, I tried to crochet over the blanket stitch. I did a sc where the blanket stitch pierced the fabric, then did 3 sc over the yarn in between the stitches. You would think that after piercing the fabric twice, and sewing the blanket stitch, and changing to a smaller hook, the project would have been an easy one. It wasn't!

That section of fabric fought me every step of the way. I struggled to get the hook through the fabric with each stitch. It took a while, but I persevered. In the end, the make-shift pattern really looks very cute. I actually really like the look of the edging - which is sad because I will NEVER make this again.

If someone can explain why one section of fleece would behave so differently from another cut from the same bolt, I would appreciate it. I've had others comment about some fleece being very hard to work with. I have had some bad luck with one sided or super-furry fleece, but have never struggled like this before with regular fleece. The fact that the first 2 blankets gave me no trouble at all, really has me puzzled. I don't know if there is something in the way it is woven that would cause these inconsistencies.

It was very frustrating to get that last blanket done, but in the end it turned out well, and I have 3 cute sets to send to 3 cute newborns.


Thursday, January 01, 2009
New Original Pattern - Bordering on Adorable!

Bordering on Adorable Cap


This cute and easy-to-make bordered cap will be perfect for those adorable newborns.


What you’ll need:

2 colors of baby-weight yarn (I didn’t measure how much I used, but small qtys of both)

E hook (3.5mm)


With main color, chain 5 and join with a slip stitch to make a ring.


Row 1 – Chain 3 (now and throughout this counts as your first DC). 11 DC in ring (12 DC total). Join w/ slip stitch.


Row 2 - Chain 3. DC in same stitch as joining. 2 DC in each stitch around (24 DC total). Join w/ slip stitch


Row 3 – Chain 3. DC in same stitch as joining. DC in next stitch. * 2 DC in next stitch, 1 DC in next stitch* repeat ** around. (36 DC total). Join w/ slip stitch


Row 4 – Chain 3. Dc in same stitch as joining. DC in next 2 stitches. * 2 DC in next stitch, 1 DC each in next 2 stitches* repeat ** around (48 DC total). Join w/ slip stitch


Row 5 – Chain 3. DC in same stitch as joining. DC in next 3 stitches. * 2 dc in next stitch, 1 DC each in next 3 stitches* repeat ** around (60 DC total). Join w/ slip stitch in back loop.


Row 6 – Chain 3. Working in back loop only for this round, DC in each stitch around. (60 DC total). Join w/ slip stitch (though both loops).


Rows 7-10 – Chain 3. DC in each stitch around. (60 DC total). Join w/ slip stitch in back loop only.


Row 11 – Chain 3. Working in back loop only for this round, DC in each stitch around (60 DC total). Join w/ slip stitch (through both loops). End off main color.


Border design:

With contrast color, attach yarn to the unused front loop from row 10 (you will work this border over the base color in row 11). Chain 1. working in unused front loop only, sc in each stitch around. (60 SC). Join w/ slip stitch. End off yarn. Pull tail through to inside of cap, weave it securely and cut any remaining tail.


The opening of this cap is about 14 inches. You can easily adjust the cap size up or down by changing your hook size.


This is an original copyrighted pattern. Please feel free to use it for personal and charity use. Do not sell the pattern or post it elsewhere, but do feel free to link to this original post. Thank you.


Tiffany, Take One


I haven't designed anything new recently, but yesterday had an idea for a new cap. I tried it last night, and like the idea. I'm calling it my Tiffany Cap because the scallop design sort of reminds me of a Tiffany style lamp I used to have.

While I'm not satisfied with the results of this first attempt, I know how I want to modify it, and I think I can end up with a really cute pattern.

It's not hard to make - I think getting the pattern down in writing will be a lot harder than making the hat!!

I need to make some blankets for Marine Corps Kids, but then I'll be back with my second attempt on this pattern. Wish me luck!


Tunisian Scarf

I love the look of Tunisian Crochet, but I don't do it very often. I'm not that good at it (yet) and it takes more work and concentration. There are lots of different techniques that I'd love to learn, but not many resources to teach them. I saw a book that I'd love to buy, but its $100!!! I don't care how good a book it is - $100 is a lot of money - and that was for a used copy!!!

So.... two weeks ago while I was at the hospital with my dad, I started working on a simple Tunisian scarf - mostly for practice. I won't point them out, but there are several mistakes in the scarf - still, overall, I think it looks good.

I'm having trouble keeping the right edge (starting edge) straight. I guess I'm changing tension on the starting stitch, so while the left edge is clean and straight, the right edge is not so lovely. If any reader has advice on that, I'd love it if you'd leave a comment.

In any case, Hubby loves this scarf, so I trimmed it in brown and gave it to him. His jacket is brown with green trim, so it will be a good match.


footer2.JPG