My friend Marlene from Edgerydoo liked this little jacket that I made, so I told her I would write up instructions to share online.
This jacket is really so easy to make, and there are so many different ways you can finish and embellish it.
Start with a piece of fleece - you want to use a solid or a non-directional pattern (if you use something with one direction, one side will be upside down).
Size - you can make this in any size you want, from preemie, to newborn, and everything all the way up to adult. Basically, start with a piece of fleece big enough to fit whoever you're making it for. I wanted to make this for a baby, so I just eyeballed what looks like baby size to me.
I started with a rectangular piece of fleece 15" wide by 20" long. This resulted in a "baby size". I don't have a baby close by, so I can't tell you if it's 3 months or 6 months - just adjust it to look right to you.
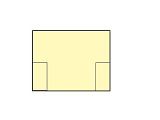
Fold the fabric the long way and lay on your cutting board so the folded end is away from you. You're going to cut two rectangles to create the sleeves. The rectangles that I cut are about 2" wide by 5" high. (again - don't get too caught up in measurements - if the proportions look right to you, it's probably ok)
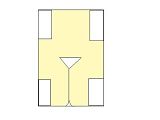
The diagram below shows where you want to cut. (I know it's small - the diagram is clickable) This diagram and the ones to follow are not drawn to scale - they're just to give you an idea of where and how to cut the fabric.

Now, open the fabric and lay it flat. The part closest to you will be the front of the jacket, the part far from you will be the back. Using your Edgerydoo and a rotary cutter (or scissors if you don't have a cutter) slice the front of the jacket up the middle to form the opening. Then cut a triangle as diagrammed to create the neck opening. The triangle that I cut is about 4" on each side (again - do what looks right for the size you're making). I used my Edgerydoo 001 triangular template to round out the corners in the center front. This is just a matter of taste. You can leave them square if you prefer.

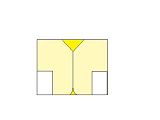
Now fold the fleece back so you can see what the jacket will look like. In the diagram below, the light yellow is the body of the jacket. The dark yellow peeking through is the inside of the back.

Now - to turn this into a jacket...
Unfold the fleece and lay it flat on your punching board. With the Edgerydoo, pierce the fabric along all the edges. Now, with a 3mm hook and the yarn of your choice, crochet around the edge doing one sc in each hole and 2 chains between. When the entire fabric is edged, finsh off your yarn.
Fold the jacket right side out.
Holding the two sides together slip stitch the front and back together under the arms and down the sides.
Now finish the arm holes, neckline and hem with the crochet edging of your choice. In the example above I just did another row of single crochet around. You can keep it simple or do any fancy edging you like.
From there, have fun! Use the scrap fabric that you cut from under the arms to cut pockets to add to the front. Crochet ties to secure the front or add buttons. Sew on patches or embroider designs on the front. Of just leave it simple.
Hope these instructions help!!!
I'm happy to share this idea with you. If you like this project, please consider making a baby sized jacket and donating it to Marine Corps Kids - its a simple way to say "thank you" to our military familes.


0 Comments:
Post a Comment
<< Home