Wednesday, September 30, 2009

This simple little blanket will be going to Marine Corps Kids. I fell in love with the embroidered fleece and didn't want to do anything ornate. This is just a row of double crochet. I think the yarn color plays of the colors in the boats nicely.
Sadly I need to take a break from baby things to make some chemo caps for someone dear to me. I hope they help her through a rough time.

Sunday, September 27, 2009

This is another nursing shawl I made for Marine Corps Kids. This one is all cotton. I think the bright colors are fun.
Thursday, September 24, 2009
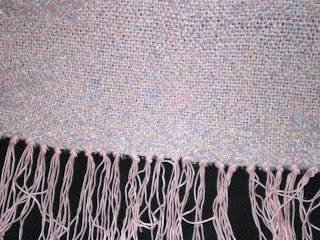

Just finished another woven baby blanket.
This one is just like "Summer Sunshine" but in soft shades of pink and blue.
I think I need to buy some more loom reeds so I can play around with more yarn weights.
Tuesday, September 22, 2009


Hubby named this one because he really liked the bright yellow yarn.
I wove this blanket with Cascade Yarn's
Bollicine in Spring Mix and Cascade Arcadia in Lemon Pie. It's soft and textured, and I hope it keeps someone warm and cozy this winter.
This blanket will be donated to Marine Corps Kids.
Sunday, September 20, 2009


I posted about my first knit project, and about my first weaving project (my first crochet project pre-dated the blog). Today I get to post about my first crafting injury. I slammed my rotary cutter into my index finger. Ouch! That smarts! I highly recommend that you use more care than I did and avoid a similar cut. It went pretty deep and it smarts, but I think I'll live.
Luckily, I didn't bleed on the new nursing shawl that I made. I'm calling this one Aquamarine because the colors blended in an unexpected way, and it reminds me of seaweed. Aquamarine is a better name than Kelp.
While I'm not thrilled with the colors of this one, the fabric is very drapey and soft. I also used a sewn edge before the fringe which made it much easier for me to finish the piece. I'm not sure if what I did is a formal method, so I'll need to research finishing methodologies.
This one will also be donated to Marine Corps Kids. Right now, I think I need to go put some ice on my finger. Owie!
Wednesday, September 16, 2009


The colors of this shawl remind me of a Sedona Sunset. The photo makes the scarf look a bit brighter than it is in reality, but the different shades of red and purple work really beautifully.
I'm so proud of how this one came out. Technically it's the best woven piece I've done yet, and I just love the way the 2 yarns combine.
This is another nursing shawl that I'll donate to Marine Corps Kids, but I want to get more of this yarn and try making a larger shawl for myself.
Tuesday, September 15, 2009

When I started each of these projects, my intention was for them to be carriage covers. I managed to get the proportion wrong though - they're a bit too long and too narrow to be any sort of blanket.
I realized then that they are a great size for a nursing shawl or blanket. They are solid enough to give mom some privacy, while light enough not to smother baby.
I'll be donating these to Marine Corps Kids.
Monday, September 14, 2009


This is a quick blanket that I made tonight for Marine Corps Kids.
I was packing up a box for new babies, and was short 1 blanket for a baby girl. This pattern is so quick and easy, that I was able to finish this blanket in just a few hours. I hope the new mom likes it.
Saturday, September 12, 2009


I finished weaving another scarf today. The colors of this one remind me of my gemstone days and Mystic Topaz - a stone that is quite beautiful, but not my favorite because it's treated, but I digress.
Still learning. I think that I warped the loom flawlessly this time, and my weaving is much better, but I tied the warp strings slightly off center which is making one side of the scarf pull. I don't think it's very noticeable, but I wish I were a bit closer to flawless. Patience is a virtue.
I have a friend in mind to give this one to, but I feel that it might be too irregular to gift. We'll see.


Mock Tunisian Washcloth
Tunisian Crochet is beautiful, but it can be tricky for a beginning crocheter to learn. This mock-Tunisian pattern is a way to cheat and get a textured fabric simply and quickly without all the intricacies of Tunisian stitches. In the first photo, the pink washcloth was created using Tunisian Crochet. The blue washcloth is made with the pattern below. The Tunisian cloth is much thicker and more dimensional, but the "mock" washcloth offers a pretty look using a simple technique.
2 colors Worsted Weight Cotton Thread (Peaches and Cream or Kitchen Cotton is Perfect)
H hook
Start out by making a simple DC square. You can make it any size you like for your washcloth.
For mine:
Chain 25
Row 1 - DC in 3rd chain from hook and all the way across. (22 DC)
Row 2 – chain 3 (counts as first DC). DC across (22 DC)
Rows 3-12 – repeat row 2.
After row 12, finish off.
(Note – you don’t have to switch colors – if you’re working with a self-striping yarn, you can get very pretty results by not changing colors – see photo of Red, White and Blue washcloth)
You will now be working from side to side across your work, weaving a slip stitch through your DC stitches.
With contrast color, attach the yarn with a slip stitch to the side post of your last DC.
Now, working in the spaces between your DCs, draws up a slip stitch in each space.
To do this, you’ll want to hold your lead yarn behind your work. Working from front to back, put you hook down through the fabric between the next 2 DC and pull up a loop creating a slip stitch. Continue all the way down the row.
At the end of the row, do a slip stitch around the final post. Now working down towards your next row of DC, slip stitch on the edge between the 2 rows, slip stitch in the 2nd row down. Now turning your work, slip stitch through the 2nd row across to the other side.
Continue this pattern slip stitching across the work, and snaking back and forth. When you get to the end, finish off and weave in your yarn tail.
Thursday, September 10, 2009

Today at lunch time I needed a break from the office, so I sat in my car and crocheted. I made a quick washcloth from cotton, and then I decided to weave a slip stitch

through it. In the end it was a neat look and sort of mimics the feel of Tunisian stitches in a much more simple way.
The first photo shows the two "fake-Tunisian" washcloths that I made today. In the second photo the pink washcloth was made in Tunisian crochet, the blue is double crochet with a slip stitch weave. They have a similar look. The Tunisian stitched cloth is much thicker and more sturdy. The traditional crochet cloth is more open and soft. The side with the slip stitches is a bit more rough for exfoliating and the back side is smooth.
I think that these will be quite practical, and they were super fast to make. It took about 20 minutes to crochet and slip stitch each of these.

I couldn't resist this adorable puppy dog fleece!
I needed more baby boy items for Marine Corps Kids, so I made this quick and easy blanket. I think the dogs are so cute that the simple edging is all that's needed.

Wednesday, September 09, 2009

I just finished this woven baby blanket on my new loom. The photos don't show the true colors - it's various shades of blue, green and white. The warp is mint green baby yarn. The weft is Bernat Lulu - a discontinued yarn that I stocked up on because its so ridiculously soft.
This blanket is very light weight, but super soft and warm.

It was my first project on my new loom, and I'm pleased with it.

This blanket will be donated to Marine Corps Kids.
Tuesday, September 08, 2009


This edging is so fast and easy, but really cute! I was working with this adorable transportation fleece. The fabric is so busy and vibrant that it didn't need an intricate edging. This is what I came up with. It's fast, simple, but really cute.
Easiest Ever Edging
You'll need:
2 colors of contrasting yarn (enough to edge your project)
2.5 mm hook
5.0 mm hook
Cut and pierce your fabric per the
Edgerydoo instructions.
Row 1: Using 2.5mm hook, SC-chain2 in each hole all the way around the fabric. Slip stitch to first SC. Finish off.
Row 2: Using 5.0 mm hook and 2nd color of yarn, attach the yarn at any sc. *SC in stitch, sc in space between stitches*. Repeat *pattern* all the way around work. Slip stitch to first SC. Finish off.
You're done!
Could that have been any easier????
The first color peaks out from under the second giving a nice look. Use colors with high contrast for fun, or shades of one color for a more subtle look.

Hubby and I practice traditional anniversary gifting. Our next anniversary will be our fourth - the fruit and flower anniversary. Hubby decided that he was going to buy my a loom for our anniversary. A bit of fruit and he had "fruit of the loom" - a perfectly appropriate 4th anniversary gift. The only problem is that our anniversary is at the end of February, and there was no way that I could wait almost 6 months for my loom. Happy Anniversary to me....a tad early!!!
The loom arrived today, and hubby put it together and had it all set up as an anniversary surprise for when I got home. Isn't it gorgeous? It's large enough that I can make baby blankets. I'm just delighted with it, and can't wait to start weaving on it. Of course, I'll start that tonight!
Thank you, Honey!!! I just LOVE it! What fruity gift I'll get you? I have no idea! Luckily, I have over 5 months to try and come up with something half as delightful as the gift you bought for me,
Monday, September 07, 2009


The Purple Iris scarf that I posted is made from cotton and is a light year-round scarf. This one, Blue Iris, has a very similar color pattern, but is made from wool. After I finished weaving the scarf, I lightly felted it. The blue weft yarn is pure wool and felted moderately well. The multi-colored warp yarn is a wool blend and didn't felt much. I like the look. Felting this scarf made it much softer and more comfortable. It allowed the blue yarn to fill up any open weaving spaces and accentuates the colors in the warp yarn.
Making this scarf I experienced a whole new set of challenges. I knew I planned to felt this one, so I intended to make it wider and longer than average to allow for shrinkage. I ran out of the warp yarn before I had achieved the width that I wanted.

I did make the scarf longer than I wanted. Because the weft shrunk more than the warp, I ended up with a very long skinny scarf - which is perfect because my intention was for this one to be wrapped twice around the neck - yeah, that's what I intended!

Early on I realized that something was wrong - my scarf wasn't advancing on the loom properly and looked cock-eyed. I didn't have the experience to know what was wrong though. Turns out that one of the strings that holds the advancing bar in place fell off, so when I tried to advance the piece, it wound more tightly on one side than the other. As a result, my weave is slightly off throughout the scarf. No problem - I planned to felt, and felting can hide a lot of mistakes.
This was a fun scarf to make, and despite the problems and imperfections, I think it made a pretty fabric. I twisted the fringe because I wasn't sure what it would do when felted and I love the look of twisted fringe.
The photos show the work in progress. I'm not sure if you can see

the subtle differences in the scarf texture before and after felting.
Sunday, September 06, 2009


This is a scarf that I wove on the heddle loom.
For the warp I used Patons Grace yarn in shades of purple, blue and cream - all the colors of iris. For the weft I used Knit Picks Crayon in purple - lest the name Purple Iris.
This project is far from perfect, but its my first project where I didn't make any mistakes warping the loom! I don't think I miswove anything on the weft, but my spacing still needs some work.
I thought it would be fun to add some beads to the fringe. I found some very pretty purple beads wrapped in wire. They're probably just glass, but I thought that they were very fun so I added them to the ends of some of the fringes.
I have a lot of work to do before I can say that I've "mastered" the loom, but this is the first project that has no really obvious mistakes.
I'll be sending this one to my sister.


Every now and then, I get the itch to work in Tunisian crochet. I love the look of Tunisian projects, but I find it a bit tedious to do, so the itch doesn't last that long. That makes wash cloths and dish cloths the perfect projects for me. They're small, but useful.
Last night I wanted to do some cro-knit, so I grabbed a double sided hook and some cotton yarn and made this little wash cloth. I love he way cro-knit provides a distinct color pattern on opposite sides. The fabric it creates is thick, and perfect for wash cloths.
This one will go to Marine Corps Kids.
Saturday, September 05, 2009


I saw this pattern for a cabled baby sweater and thought it was so cute!
The pattern is available free to anyone who registers at Free Patterns dot com. If you're interested, you can find it by searching for "Mix and Match Outfits".
The cables on this sweater are made slightly differently than those that I used for my cabled blanket. I think I prefer the other design. This pattern, though, is very simple, and a great pattern for beginner cablers. I think the finished sweater is a bit long though. If I make is again, I'll change the stitches from DC to HDC (leaving the cables in DC) to shorten the length a bit.
When I went to put my leftover yarn away, Tater jumped into my yarn closet. He saw a piece of yarn dangling down, and couldn't resist the temptation. Not sure how he squeezed 20 pounds of cat into that little area, but he sure is cute!
Friday, September 04, 2009

Tonight I wove this striped scarf. In the photo the stripes look pink, but they're really a variegated pink, purple and coral - the same yarn I used for the class scarf last week.
Making this one, I learned a lot.
1) always figure out the desired size for the finished piece and measure the yarn as you warp the loom. This scarf is too small.
2) my skills seemed better as I made this scarf - my edges were straight and the weave was even
3) I chose the wrong yarns for the warp. I used the variegated yarn, and a black nylon blend yarn. I used the nylon because it adds a little shine that I thought would be pretty. The yarn stretched terribly as I was working the weft. I had to tie up my warp strings and rig them to the loom. It's remarkable that I was able to finish this project. Also, because the yarn stretched, my spacing throughout the scarf changed as I advanced the scarf.
4) I couldn't untie the nylon yarn knots, so I had to cut. As a result, I was left with very short fringe. Longer would have been better.
I wasn't going to bother finishing this project because of all the problems, but I decided that it was good practice and that I could throw the finished scarf in the irregular heap that I'm sure to accumulate. Oddly enough, the finished piece looks pretty good!! I'm really pleased that I was able to salvage anything. This would actually be a cute scarf for a child. Maybe I'll have to find one to give it to. :)


 This simple little blanket will be going to Marine Corps Kids. I fell in love with the embroidered fleece and didn't want to do anything ornate. This is just a row of double crochet. I think the yarn color plays of the colors in the boats nicely.


